Sunday 30 July 2017

Mauser M03 - Magazine Disassembly

A topic came up on the Mauser M03 Blog Discussion Forum, about rounds jamming when the bolt was being closed slowly. I'd had some experience with this when using long pointy bullets in handloads, seated out a long way to be close to the lands. As I wrote in the forum, this is asking for it!  The original poster was having a different problem. When the last cartridge was being fed slowly from his magnum rifle magazines, the rim was popping up too high once it cleared the rails. Feeding quickly worked OK, as with my M03s.

Most rifles feed best from the magazine when the bullets are round or flat tipped and standard cartridge overall length isn't exceeded. Most rifles also feed best when the bolt is moved forward briskly.

"But I like the long pointy bullets." :-(  "And I like feeding slowly sometimes." :-|

If I get a jam when I'm feeding slowly it's usually the third round in the magazine that does it. The magazine spring is not pushing up as hard as it was for the first two rounds. The round below the third round (which we'll now call the top round) gets a nudge from the bevel where the bolt head meets the bolt body and starts moving forward too. When the bullet tip of the top round rises up the magazine's feeding ramp the case's rim is levered down, which tilts the nose of the round below it down. This makes the rim of the round below engage with the bolt head/body bevel even better. The tip of the round below contacts the rubber bumper on the inside of the magazine's front wall and digs in a little. The reduced upwards pressure from the magazine spring is enough to help it get stuck in that posture. As the bolt keeps pushing the top round forward there comes a point where the lack of upwards pressure from the round below causes its rim to slip under the bolt face. Bingo - we have a jam.

To reiterate, this only happens if I'm feeding very slowly from the magazine and only with the third (and sometimes the fourth) round. I can always feed the first round from a full magazine slowly and quietly if needed. I'm glad I did when I met this pig shortly after walking away from my car.


Using a dry PTFE (Teflon) spray to make the insides of the magazine slippery was suggested in the forum, based on experience with the particular slow feeding problem I've described. I'll be giving that a go and decided to disassemble the magazine, to clean the insides and help the application work optimally. Gulp! Here's how that went.

- I didn't have a narrow enough punch for the pins at the front of the magazine, so took a small nail and flattened its tip. I rested the magazine on the edge of a small piece of wood, with a cloth between, such that the bottom plate would not be subject to any force.

- What looks like three pins holding the plastic front piece onto the metal sides of the magazine are in fact six short pins, each 7.5mm long. They should only be driven in about 2.5 mm, to clear the holes in the outer plastic walls of the front piece and the metal sides of the magazine. The pins will then be retained by the inner walls of the front piece.


- The two top pins can be driven in further as there is nothing inside of them to interfere, but the four bottom pins should not be pushed in more than 2.5 mm, as they will make contact with the rubber insert that protects the bullet tips. If you feel resistance, stop hammering!

- The pins are easily pushed with gentle tapping. Once they've been pushed in enough the plastic front piece will easily separate from the magazine's metal sides. The pins might fall out so be careful not to lose them.

- The rubber insert can then be prised and pulled out gently. It needs to be, to retrieve the four bottom pins. I used a broad flat tip screwdriver and then some bent nose pliers with smooth gripping surfaces, to avoid marring the rubber.

- The magazine spring can then be pulled out from under the follower. It's asymmetrical, so take note of its orientation. The higher of the two spring tips goes to the back of the magazine, to ensure that the magazine follower pushes the rim of the top cartridge up effectively.

- The magazine follower itself can then be slid out of the magazine, with some tilting to clear the indents in the side panels. During factory assembly a little grease was applied to the underside of the follower, to help the spring's contact points slide as it compresses and expands. I think I'll put a little new grease there, once the PTFE has cured.

To be clear on this, I've only ever noticed jamming when I've been feeding very slowly. It's then only with the third or sometimes the fourth round in the magazine. There's a number of contributing factors and one surefire fix, which Mauser would offer in the form of, 'Just close the bolt quickly and enjoy your rifle!' You'll see in this video, that's exactly what Walter Siebert at Mauser does. :-)

Saturday 13 May 2017

Mauser M03 - Installing Riflescopes to Double Square Mounts

Please read the whole of this post before starting to mount your scope. Thanks, Rick.

For some time now I've been meaning to write a post on what I've learnt from installing my Zeiss and Kahles riflescopes to Mauser's Double Square Mounts. A comment with a question on this came in overnight, so this will be my attempt to pass on some knowledge. 'What's the problem? They're just scope mounts', I hear you say. Well, there is a difference between fitting scopes to Mauser M03s with Double Square Mounts and fitting scopes with 'normal' non-quick-release mounts to 'normal' receivers.

When mounting any riflescope to any receiver the idea is to achieve a tension free installation. For example, the mounting hardware should not impart any torsion to the scope tube. Nor should the scope tube impart any torsion to the mounting hardware! Now, with a normal receiver it's not at all easy to tell if the installation job has been completed in a tension free manner. The scope and mounts are fixed on to the receiver and that's that. Job's done. Too bad if there is tension, because you can't tell. Well, not easily. Accuracy might be affected and good luck trying to figure out why. :-(

With Mauser's M03 Double Square Mounts it's easy to tell if the mounting job has resulted in torsion being imparted between the scope and the mount. It's also quite easy to avoid this happening in the first place. What I'll do is provide a list of actions for installing the scope and mounts and then describe what to look for to check if the fitment job is tension free. But first I'll outline the key point in the process, which is: to avoid introducing torsion between the scope tube and the Double Square Mount's bridge, be sure to slowly and progressively tighten all of the screws in the mounting system in a oft repeated cycle, starting with the bridge already installed and locked onto the receiver. 

Tools needed:

  • a small profile Torx size T20 screwdriver, or T20 bit fitted to a long shafted handle. This is for tightening the two bridge to ring-base screws.
  • a small profile Torx size T10 screwdriver, for tightening the eight ring-top screws.  
  • optional - a torque screwdriver for final torquing of the screws. Using fingers and judgement can be just as good.
Procedure:
  • start by resting the stock and receiver (with magazine removed) on a pair of steady sandbags or the like. I left the barrel installed, for better balance and to ensure the receiver was tensioned in its ready-to-fire state. It's handy to have the receiver positioned so that the butt is at the end of a bench, to make it easy to rest a shoulder against the butt to check eye-relief once the scope is lying loosely in the bottom rings. Best not to be picking the rifle up at this point.
  • starting with the Double Square Mount's bridge and scope rings disassembled, apply a small (tiny) amount of grease to the leading edges of the bridge's swivelling cloverleaves and to the circular mating surfaces above them. Do the same to the corresponding surfaces in the mounting recesses of the receiver. Settle the bridge onto the receiver. Before using the locking arms, check that the fit of the bridge to the receiver is even and flush at both ends, with no light gaps visible. Put a white card or envelope behind to help reveal any gaps. There shouldn't be any. A little pressure with your hand might be needed to settle the bridge into place properly and to hold it against the receiver. If there's gaps, that bridge is wonky. I doubt you'll have a problem though. Close the locking arms. I try to do mine bit by bit at both ends, but I don't think it really matters if you do one all the way, then the other. If you want you can try to avoid marring the surface finish on the side of the square mounts where the locking tabs rub before snapping into their recesses. Hold their tips away from the sides of the bridge. Or you can create some patina that comes from experienced hands using quality equipment, leaving tell-tale marks that show how much the gear has been enjoyed over the years. :-)
Note: I have never 'bedded' a mount to a receiver. This process involves installing only one of the front or rear cloverleaves into its receiver recess, with the bridge and already fitted scope sticking out to the side, then rotating the scope clockwise through 120 degrees until the cloverleaf pops free. There is at least one YouTube video that demonstrates this and I've had one salesman ask if I wanted him to do it, to my new rifles and mounts. Luckily I new what he was talking about and said, 'No!' What this bedding process does is loosen up what might be a tight fitting of the bridge's circular mating surfaces to the receiver's circular recesses, thereby making it easier to lift the unlocked scope and mounts away from the rifle. OK, understood, but I'll leave mine nice and tight thanks very much.
  • use the two bridge to ring-base screws (size T20 heads) to lightly attach the ring-bases. They should still be free to swivel a little. Given that the bridge is already mounted onto the receiver, reach with the T20 screwdriver up through the magazine-well. Be careful not to scratch the walnut around the magazine-well opening. Do not apply lubricant to the screws. To avoid damage to the screw fittings (or to the scope tube from over tightening the ring screws), torque settings should be achieved with unlubricated, metal to metal screw thread contact.
  • make sure the ring-bases are at a right angle to the bridge and gently lower the scope tubes onto them. Try to avoid rotating or sliding the scope once it's in position. The edges of the rings feel sharp, but they are not burred. If positional adjustment is needed, gently lift the scope slightly free of the rings. Try to get the crosshairs lined up close to horizontal and vertical, for final adjustment later on. The pictures in this post (one of which is copied below) show that I position my scopes so that the end of the ocular lens is above the bottom of the dip in the stock's grip. This might work for you too. The idea is to have the scope in the right place so that when the rifle is lifted to the shoulder the full image circle is visible without needing to crane the head forward. Or move it back - getting whacked on the eyebrow is no fun.

Note how the end of the ocular lens is above the dip in the stock's grip. Works for me.

  • to get the reticle aligned, sit on a low stool behind the rifle with your eye at bore height. To keep your head steady, rest your nose and cheekbone against the stock and butt. Look through the bore until the circles of the near and far end of the bore are concentric. Now look up at the scope. There should be just a sliver of illumination showing in the ocular lens, with the top of the vertical crosshair near the middle of it. Keep switching your eye from the bore to the lens and if necessary, carefully and gently rotate the scope in the ring-bases until the top end of the crosshair is centred. If there's any resistance while rotating the scope tube, lift it slightly.
  • place the ring-tops on the scope tubes above the ring-bases and adjust them so that the gaps between the tops and bases are even at both sides. Drop the eight screws (size T10 heads) into position. Use the T10 screwdriver to get the screws engaged with the threads of the ring-bases, but don't apply any tension yet. Check again that the side gaps between the rings are even. Look down at the screws and give them all a number, moving from left to right and down the length of the scope. The screw at top-left will be 1, the screw at top-right will be 2, ... , the screw at bottom left will be 7 and the screw at bottom right will be 8. We'll call the T20 screws under the bridge A and B.

Mauser M03 Double Square Mount - numbering the screws for the tightening pattern, described below.

  • now that the weight of the scope is keeping the ring-bases at a right angle to the bridge, it's time to apply the slightest amount of tension to screws A and B. Barely snug them up this first time, while pushing down a little on the scope to keep the ring-bases from rotating
  • then, start applying the slightest amount of tension to each ring screw, in a pattern that will ensure the scope is not rotated in the rings by tightening one screw or another too much. Use the following order for the first round, again, with only the slightest amount of tension being applied. 1, 4, 5, 8, 2, 3, 6, 7. Then add a touch more tension to A and B, while pushing down gently on the scope again.
  • repeat this cycle with screws 1 through to 8 and A and B several times, slowly and progressively increasing the tension. It might take twenty cycles if you go gently and slowly. Screws A and B are likely to start feeling a bit tight more quickly than screws 1 to 8. That's expected, but try to reach the end of tightening for all screws at the same time, noting the different torque settings described in the dot-point below. Keep checking that the side gaps between the rings are narrowing evenly. There should be about a millimetre of gap remaining at the end of tightening.
  • I couldn't find any guidance from Mauser or the scope manufacturers on torque settings for these screws, so settled on settings listed by other manufacturers that looked right and matched my previous experience. I finished the tightening sequence when I had reached 2 Nm for the ring screws (1 to 8) and 4 Nm for the bridge to ring-base screws (A and B). These settings are close to 18 lb/in and 35 lb/in respectively. For the ring screws 1 to 8, this is not particularly tight and is comfortably achieved by firm finger tightening with a screwdriver. For the bridge to ring-base screws A and B, it's more of a firm hand hold on the screwdriver. Depending on your setup and tools, the final tightening of A and B might be done once the mounts and scope are off the receiver, as reaching up with a tool through the magazine-well is a bit awkward. There is no need to use a wrench to get more leverage on any of these screws! I'm going to suggest that you avoid using a torque wrench, even a very small one (and even though I did at first). These wrenches are not very accurate, particularly at the lower end of their ranges. It's too easy to turn a screw too tight, waiting for the click, with insufficient feel for how tight things are getting. I was very careful when using my little torque wrench that one time, but didn't enjoy the lack of feel. Better to rely on the nerves in your hands, or a trusted, quality, light duty torque screwdriver, that preferably has the setting that's needed in the middle to top half of its adjustment range. If I keep getting older (probable) and keep losing the fine sensation of touch in my fingers (possible) I might have to treat myself to this nice set of torque screwdrivers from Wera in Germany. :-) (who have since advised me that these tools are made next door in the Czech Republic. That's OK - the Czechs have a fine history of quality manufacturing.)
Checking for Torsion.
  • once all of the screws have been tightened, unlock the Double Square Mount's locking levers. As with locking these levers, I try to unlock mine progressively at both ends, so that one isn't completely loose while the other is completely tight, but it probably doesn't matter. Lift the scope and mounts off the receiver and then carefully lower them back into place again. Let the mount settle on the receiver, with a little push if needed, but don't swing the locking arms. Use the white card or envelope in good light to see if there are any air gaps between the mount bases and the receiver. There should be nothing to see. Check to feel if there is any side to side rocking of the mount bases on the receiver. There shouldn't be any. If there is it's caused by the front and rear rings having been tightened onto the scope tubes slightly rotated relative to each other. This can happen if the ring and base screws were not tightened in the gentle, progressive and cyclical manner described in the dot-points above. Chances are no harm has been done; simply loosen all the screws progressively, starting with A and B first, then 1 to 8, and start the mounting process again, being more careful this time. :-) However, I'm anticipating that if the instructions listed above have been followed, there'll be no problems.
Lastly, please respond with a blog comment or a forum post to let us all know how you get on. If your scopes have already been installed into Double Square Mounts, are you feeling any rocking of the mount bases on the receiver, or seeing any light gaps?

Friday 12 May 2017

Mauser M03 - Works on Foxes

There was a big, fat full moon on Wednesday night. In my part of the world it rose just after sunset and stayed up there until dawn. A perfect full moon. It could have been ruined by cloudy weather but the sky was crystal clear. And to top it all off, the temperature only got down to -1C, which a Landcruiser's heater can easily deal with, even with the driver's window down. However, I will admit to putting a glove on while holding the spotlight out the window, after midnight.

I had a chat with the farmer when I arrived, to get the latest tips on where the pigs had been hanging out. No news on that front, but I was asked to keep a count of how many foxes I saw. I thanked the farmer for the glowing piles of logs in one of the paddocks, which would be handy for warming my bones early in the morning, as well as for heating up a can of food for dinner.  He laughed as he remembered a similar situation years ago, when he'd inadvertently invented the MOABBB - the Mother Of All Baked Beans Bombs.

The first two foxes I saw were in the big paddock below the farm house, where the earth is soft and wet and full of tasty morsels for foxes and pigs alike. To be picked up at distance a fox needs to be looking at the spotlight, which they will curiously do if it's not too bright for them. That's why my first shot was at the more distant fox, at 240 metres, with my Mauser M03 Deluxe, using the 243 Winchester barrel and Kahles K624i scope I'd checked in the previous post. I knew it was bang on. Given the good weight of the M03, there was very little felt recoil from the Berger 68 gn Flat Base bullet. The second fox was further left and down the slope, at only 150 metres. The shot I'd just fired didn't bother it and it didn't move until it didn't move, ever again. That's how we like our foxes here in Australia. The deader the better. I took this photo once the sun was up, with a light frost making its fur sparkle.

Fox no 2 shot with a Mauser M03 with a 243 Win barrel. Berger 68gn Flat Base.


The next two foxes were running around together at the other end of the property, near another of the farm houses. I wanted to keep the noise down (best to ask those who heard the bangs over the sound of the telly if I was successful!) so pulled out my Sako Vixen in .17 Remington. Two foxes fell, east and west of the house. A third one, which was almost the first one, got away just before I was ready. He looked like an old timer who might have learnt that when that bright light turns up and the rumbling noise stops, a loud bang soon follows. I'm out'a here!

Fox no 3, knocked over with a Sako .17 Rem and a 25gn Hornady bullet.


Fox no 4, shot the night before with a Sako .17 Rem.
I slept in the back of the 'cruiser from one o'clock until four, parked above the broad view where I got this big boar last October. It seems the word had got out that it wasn't easy pickings anymore in that paddock. Once I was up and at 'em, a sweep with my binoculars under moonlight, and then again by spotlight, found nothing. I'd been confident I'd see pigs here, but not this time. No foxes either. Hmmm?? :-(

Never mind. The light was soon growing as the moon handed over to the sun and by then I was shivering as I quietly stalked back and forth between two overlooks, each with pig-mangled pasture spreading out below as evidence of these being favourite rooting grounds for years on end. I watched with anticipation as the sun broke over the hills in the distance, cheering on the rays of warmth which were striking here and there around me, but not where I was standing, for some inexplicable reason. My patience was eventually rewarded with the gift of warmth. I'll never tire of standing sentry at dawn over a perfect hunting ground, with a Mauser over my shoulder.

I found a fox with the Zeiss scope, about one and a half kilometres away, still in the shadows and working it's way across the paddocks, vaguely in my direction. It disappeared into a blackberry infested creek line. Ten minutes of me enjoying the sun later, it popped out of the blackberries only 130 metres below me. 'Chances are I'm not going to see a mob of pigs burst out behind it', I thought. Earplugs in, earmuffs on, 270 up to my shoulder, left elbow resting on hip, left thumb under the trigger guard, two fingers under the magazine. Quite steady. The fox didn't stop trotting and was about to be hidden by bushes so I fired and missed. Instead of running it decided to sit, next to a young, forked gum tree and tried to figure out what that noise was, and that new pock mark in the ground. It wasn't there a second ago. Clearly this was not the old fox from last night. My second shot was going to have to sneak between the forking tree trunks. Wobble, wobble, wobble, pull! Got him! A touch too much gun, but needs must.

Fox no 5, clobbered with a Mauser M03 at 120m with a 270 Win barrel and 150gn Berger bullet.


Sunday 16 April 2017

Mauser M03 - Barrel Change Accuracy - First Shot - 243 Winchester

Watch this!


Fantastic barrel change repeatability from the Mauser M03 rifle system. :-)

I should add, this is the first shot fired after completely disassembling this M03 Deluxe receiver and stock a few weeks ago, as described in this post.

Friday 14 April 2017

Hunting with a Mauser M03 - Perfect Accuracy

I followed up my successful stalk last Sunday, described in the previous post, with another visit to the same paddocks late on Tuesday afternoon. As a preview of how that went I'll just say that I was seeing pigs before I'd even unlocked the roadside gate. :-)

I started writing this blog a few years ago to help fill a hole in the internet, being the lack of reports from owners on the performance and accuracy of the Mauser M03 rifle system. Well, I'm ready to say that even though there's more I can do with precision hand loading techniques to wring tighter and tighter groups from these barrels, I'm totally satisfied with the accuracy I'm witnessing, over a bench rest at the range, over the hood of my car or out stalking. The result on Tuesday was three from three, and all quite testing shots. Perfect accuracy.

A young sow at the forest edge. Mauser M03, 270 Winchester, Berger 150gn VLD Hunting


This first one was the larger of a pair I spotted in the shadows of the forest that runs along the opposite side of the paddock I was about to enter from the road. I was sweeping the tree line with my binoculars before making the inevitable noise of opening the gate and felt the usual jolt of excitement, which never seems to fade. Problem is, I was still dressed in town clothes and my Mauser, it's bolt and the bolt head were still secured in three different places. The two pigs were 700 metres away; it was unlikely they would be bothered by me rushing around like Homer Simpson with his hair on fire, changing my socks, lacing up my boots, changing shirts, assembling a rifle, rattling ammunition into a magazine, then unlocking the gate and driving in. I checked; they hadn't been spooked, so I kept driving towards them, quietly, in first gear. Stalking in a Landcruiser. Luxury!

The pigs had moved into the paddock through a hole in the fence made earlier by their friends and found a nearby patch of fresh, green grass. Over summer the sheep and cattle have trodden the earth under the gumtrees into dust while seeking shelter from the sun. A couple of weeks of unusually good and steady autumn rain has transformed these zones into little gardens of Eden. When I was 250 metres from them I carefully turned the Landcruiser ninety degrees to the right, so I could use the hood as a firing rest. I was worried that this move would make them run, but they kept on grazing, out in the last rays of the afternoon sun. I stayed ducked down as I set up a pair of rice-filled bags to support my M03; the 270 Winchester again. It already had a round in the chamber, perfectly safe because of the Mauser's cocking mechanism. I simply needed to swing that cocking lever to the right and fine tune the rifle's elevation with the rear bag. I dialled the Zeiss scope up to 10 power; these weren't huge pigs and flare from the sun was quite troublesome. I paused and thought, 'OK, the barrel has been oiled after the wet day last Sunday, then wiped dry this afternoon with a pull-through. It should print slightly high for this first shot'. I left the scope's elevation set to 200 metres. I didn't bother with the set trigger; the 950gm normal weight trigger is just perfect for shots like this. But I did have my left hand tweaking the butt stock in the rear bag, for aiming, rather than holding the fore stock tightly. This meant that the rifle jumped with the recoil and all I saw after that was the smaller pig bolting as if his life depended on it.

'So what happened?'

I wondered if I'd messed up a perfect opportunity as I started to drive over there, having abandoned all attempts at being stealthy. No pig. 'Shit! How did that miss?' I drove past the fresh lawn of grass seedlings and along the fence and then spotted a tan coloured lump in the older, dry grass, just inside the forest edge. The pig had run 40 metres, got through the hole and then conked out. It was a perfect double lung shot, which is exactly what I'd aimed for. In a moment I'd gone from confused and annoyed to pleased and proud; hunters will know this feeling.

The sun was below the horizon by the time I'd walked up onto the ridge in the adjacent paddock, where I'd shot the big boar on Sunday. Half an hour later the light was fading fast but was still bright enough for me to watch a huge sow walk out from some tussocks and into a clear field, about 150 metres below me. In moments, four medium size pigs caught up with her; piglets from last spring no doubt. I slipped behind the cover of a nearby tree and took a rest with my left hand against the trunk. I waited for the smaller pigs to get out of the way then put a shot into the sow's shoulder. I wanted her to drop on the spot and that's exactly what the Mauser and the Berger 150 grain VLD Hunting bullet made happen. Because she didn't run, her followers didn't run. The three that were still standing after the next shot did though, in three different directions. It was remarkable how quickly they got themselves back together. Only a minute later I saw them further down the slope by a creek, milling around, about 300 metres away, wondering what to do. From previous situations like this I've seen that young pigs will come back if given the chance, so I waited. By the time they were coming closer it was just a bit too dark. I could see them circling around each other, 100 metres beyond where the sow was, but not clearly enough to take a shot.

I walked back to get the Landcruiser in the dark, with a plan to set up with the spotlight and wait. Once I had the car in place and everything ready, some magic happened. It's Easter, and Easter means chocolate, holidays and a full moon. It was the full moon that got my attention, when it came up from behind the same hills that revealed the sun a couple of days earlier, in that glowing red, smoky, foggy, spectacular dawn. The air was crystal clear now and the low angle of the moon lit the field up with surprising definition. I had a wonderful view of the scene below me and plenty of light to see details with binoculars or riflescope. I've never really needed the fine illuminated dot in the Zeiss Victory HT 2.5-10 x 50 scope that I use with this M03. I dialled it right down so it was barely there, this perfect little floating firefly that I could drift over the pigs that were sure to appear. But, the afternoon and evening had been perfect enough and it all came to an end, when a solid blanket of cloud slipped under the moon and shut the show down. Oh well. Next time.

A whopping great sow. Mauser M03, 270 Win barrel, Berger 150gn VLD Hunting


A little orc from the sow's litter last Spring. Mauser M03, 270 Win, Berger 150gn VLD Hunting


Monday 10 April 2017

Hunting with a Mauser M03 - A Big Boar

Last winter my Mauser M03 and I met up with a sow and seven offspring one cold and sunny morning on a beautiful farm. Click here to open that story in a new window.


Last Thursday, late on a sunny autumn afternoon I was taking my first walk for the season through the same area. I drove quietly through the farm and parked in a sheltered hollow just short of the last gate, which would let me into a paddock that was surrounded by forest on three sides. It had a ridge line running diagonally through the middle, with soft, green pasture falling away to the tree-lines. Just the way the piggies like it. I've been told that mobs of thirty have been seen here. It's about as good a paddock for stalking up on pigs as a fella is likely to find.

The sun was still an hour away from setting as I slipped through the gate and started up to the ridge. My plan was to walk calmly back and forth along the reverse slope, to keep a stealthy watch on all of the forest edges, until dark. That plan quickly went out the window when I tripped over five medium size pigs in the lush grass, no more than 50 metres inside the gate I'd just closed. I was on a march to get up the hill and had my head and eyes scanning to starboard as I came over a crest, which is why I didn't see them at 60 degrees to port when they were only 15 metres away. Still, I saw them before they saw me! I think it was my hands moving up with my earmuffs that attracted the attention of one of them a couple of seconds later. It let out a grunt and started running. Three others were quick to catch up and by the time I had my M03 unslung, cocked and shouldered, they were tightly bunched and 50 metres away, moving fast. How the bullet I fired at the middle one missed all of them is a mystery. The fifth pig was a little bigger and slower off the mark and I switched my concentration to it as I ripped the bolt back and ran a new round into the chamber. My mistake this time was that I tracked the pig with the crosshair rather than running through to its leading edge. Missed again! And then they were gone. :-| No amount of quiet walking along the ridge line was going to bring them back, nor any others that might have been in the area, so I enjoyed the view and the sunset and thought about my poor, out-of-practice shooting efforts. Next time!

Next time was the next day and I felt unreasonably disappointed when the five pigs were not in the same spot. I had my earmuffs on already this time and my Mauser in my hands. Hmmm. Grrrr. I'd seen nothing by the time it was too dark to see anything and upon reaching the car, decided to exit the farm by driving through the gate, over the ridge and out via another two paddocks. I'd wave the spotlight around a bit and still be home for dinner. Those five pigs must have been sitting in the shadows of the forest, watching and waiting for me to walk out of the paddock, because there they were, in the Landcruiser's headlights when I drove over the first crest. I'm convinced these pigs are leftover from the seven piglets I fired at last winter; they reacted so quickly to being disturbed. I didn't even bother trying to set up for a shot. But then the last one, the bigger and slower one, couldn't find the hole in the fence and started running backwards and forwards. I jumped out, set the light, opened the rear passenger door, grabbed my Mauser and poked the barrel through the open window of the open front door, just in time to find Dumbo in the scope, squeezing under the mesh. That's twice they've got away! This calls for special measures!

I gave the pigs and me a rest on Saturday and cooked up a plan for another meeting on Sunday morning. How is it that when the boys and girls at the Bureau of Meteorology say, 'Possible showers from midday or late afternoon', I have the windscreen wipers on full tilt as I'm driving up to the farm, while it's still inky dark? Big, slow, fat raindrops were slipping down the back of my neck when I opened the farm's front gate. I gave a thought to heading back home for a warm breakfast in a warm bed but checked the weather radar on my iPhone first. With a bit of luck the worst of the showers would soon end as a long hole in the radar reflection moved over the top of me. Nice one! By the time I'd driven along the muddy track, past many curious cows and up to my unlucky paddock, there was just enough light in the sky to see the clearer patch in the clouds, as promised by the radar, right overhead. It felt a bit funny to be assessing the weather by looking up at the sky. Ha! I'd already put my raincoat on, back at the first gate, and was about to walk away from the car when I decided to take a chance. It would make me overheat and was noisy, so even though the light was growing quickly I took the time to unlock the car, un-shoulder my Mauser and lay it carefully on the backseat, then move my spare ammo, earplugs, earmuffs and phone from coat pockets to jacket pockets. It took a couple of minutes but it was worth it. Apart from drips from trees (lots of those) there was no more rain to bother me that morning in that unlucky paddock. Maybe my luck was changing?

Or maybe not. I walked all around the paddock and then up and along the ridge line, back and forth. Slowly back and forth. Nothing. There was smoke from a nearby hazard reduction burn wafting in, making it hard to see the tree-lines clearly, not to mention making it hard to breath while going uphill. Then a thick fog joined in, reducing visibility to less than 40 metres. Really?! What else?! The sun came up over distant hills and looked like armageddon through the thick haze, which was now glowing red. Just like 'Nam, man! I got off the ridge and went for a long, straight walk along the adjacent and flatter paddocks, to where I found those eight pigs last winter. And, … nothing. The fog had lifted, sooner than I thought it would, so I headed back up to the ridge line. It took 160 fast and strong steps to get up, via the steepest route. I didn't count my heart-rate but it was surely illegal for my age. That daily bike riding must be helping. A family of magpies in front of me let the whole bloody neighbourhood know that a recovering human was approaching, so I stood for a while to see if they'd get used to me and let up. Nope. And then I saw him; a big, solitary pig, nosing around in the bark under a tall gum tree, about 60 metres away along the ridge. I was bringing my rifle off my shoulder when he decided to see what those stupid magpies were going on about. Did they really need to let the whole bloody neighbourhood know that a top boar was approaching! He decided he didn't like the look of my shape and immediately took off on a trot. I was pleased that he hadn't bolted at top speed and moved forward at my own trot, to a tree I'd use for a firing rest. Despite my elf-like progress, my boots crunched on the sticks underneath and he quickened his pace in response. Then I lost him behind some bushes. I took the chance to move forward to the next tree, 15 metres further on, to reduce the distance that was opening up between us and to improve my sight lines. I quickly took a rest on the trunk and cocked the M03's action. The boar reappeared and was about to run down a slope that would have taken him at full speed out onto one of those green pastures I mentioned, but changed his mind and went straight away from me, still up on the ridge. I now had a clear line of sight for a 150 metre shot. The Zeiss scope was on 4 times magnification so the cross hair was quite steady when it swayed over his big rear end. Texas Heart Shot. Bang! Whock! Got him!

His front legs were still working and pulled him in a scramble down the slope he really should have taken in the first place. He flopped into a shallow erosion channel above the paddock's water dam. I'd already reloaded, but took a moment to pick up the ejected 270 Winchester case at the base of the tree. It's a Norma one, after all! And I reuse them. A short while later I'd moved closer and a second shot from my Mauser put his attempts to escape to an end. Instantly. These Berger 150 grain VLD Hunting projectiles work really well. They open up so quickly and dump their energy so effectively that well placed shots are like a light switch.

I didn't want to leave him in the channel above the dam. I brought the Landcruiser up, got my work-gloves and then nearly blew a gasket while dragging him to a clearer spot. Stuff this! I'll use the 'Cruiser to drag him. I had to go slowly in first gear low range, to avoid snapping the light cord I had. I untied him in the middle of the open pasture, overlooked by the ridge I'd walked along for most of the wet, smoky, foggy, hazy but ultimately lucky morning. I'll climb back up that ridge in a few days and sneak into position, to see if Dumbo and his mates have found him. Chances are.

A large boar shot with a Mauser M03 in 270 Win using Berger 150gn VLD Hunting


A large boar shot with a Mauser M03 in 270 Win using Berger 150gn VLD Hunting

There's the ridge in the background. I'll use it for cover when sneaking up in days to come.

A large boar shot with a Mauser M03 in 270 Win using Berger 150gn VLD Hunting


Sunday 2 April 2017

Mauser M03 Blog - Index of Posts

I'll keep this index of Mauser M03 Blog posts updated, to make it easier for readers to find articles of interest. A link to the index will be at the top of each post. I've organised the posts into subject groups, with a few links duplicated due to coverage. If you find a dodgy link, please let me know. :-) Rick.

Mauser M03 Accuracy and Repeatability

Mauser M03 - Fast Switch-Barrel Action
Mauser M03 - Barrel Change Accuracy - First Shot - 243 Winchester
Mauser M03 - Good Accuracy with 6.5x55
Mauser M03 - Good Accuracy at 500 Metres with 6.5x55 Swedish Mauser
Mauser M03 - Good Accuracy with 30-06
Mauser M03 - Good Accuracy with 270 Win
Mauser M03 - 300m Accuracy with 270 Win
Mauser M03 - Accuracy with 243 Win and 270 Win
Mauser M03 - Accuracy at 300m
Mauser M03 - Barrel Change Accuracy
Mauser M03 - Excellent Accuracy with M03 Target
Mauser M03 - Perfect First Shot After Barrel Change
First Shot Accuracy with a Mauser M03
Three Mauser M03s vs a Beer Box
Mauser M03 - Barrel Change Accuracy
Mauser M03 - 243 Win Accuracy
Mauser M03 - Accuracy - 243 Win & 6.5x55
Mauser M03 - Accuracy - 243 Winchester
Mauser M03 Accuracy - The First Shot
Mauser M03 - 270 Win and 30-06. First shots.
Mauser M03 - Accuracy & Repeatability - Part 2
Mauser M03 - Accuracy & Repeatability - Part 3
Mauser M03 - Accuracy & Repeatability - Part 4

Mauser M03 - Technical and Information Posts

Mauser M03 - Good Accuracy After Bolt Catch Repairs
Mauser M03 - Magazine Disassembly
Mauser M03 - Installing Riflescopes to Double Square Mounts
Mauser M03 - Disassembly and Trigger Design
Mauser M03 - The 'New' Shorter Barrels
Mauser M03 - Zeroing at 300m
Mauser M03 - Barrel Change
Mauser M03 - Chronographing 6.5x55 Loads
Mauser M03 Deluxe - Photos
A new Mauser M03 in Norway
Mauser M03 Deluxe
Mauser M03 - Bolt Disassembly & Assembly
Mauser M03 - Rifle Box
Mauser M03 Expert - it's got the lot!
Reticles - First Focal Plane vs Second Focal Plane
Cocking levers - why I like Mauser's
Recoil with the Mauser M03

Mauser M03 - Comparisons and Choosing to Buy

Blaser vs Mauser? Click vs Bang!
Cocking levers - why I like Mauser's
Recoil with the Mauser M03
Choosing a Mauser M03 or two
Blaser vs Mauser? Part 1. First Look.
Blaser vs Mauser? Part 2. Accuracy.
Blaser vs Mauser? Part 3. Scope Mounts.
Blaser vs Mauser? Part 4. Fresh eyes. 
Blaser vs Mauser? Part 5. A Decision.
Left Brain - Right Brain. Helix on the Brain.
What else is out there? Sauer? Strasser? Heym?
The clever little Merkel RX Helix
Those Blasers are very interesting
A talk with John Miall
Blame it on Leica.

Mauser M03 and Riflescopes

Mauser M03 - Scope Ring Height
MSR Reticle in Kahles K624i
Kahles K624i on Mauser M03
Reticles - First Focal Plane vs Second Focal Plane
Zeiss Victory HT Scopes on Mauser M03 Rifles
Blame it on Leica.

Mauser M03 Hunting Stories

Mauser M03 - Perfect First Shot Performance

Friday 24 March 2017

Mauser M03 - Disassembly and Trigger Design

Readers of this blog will be familiar with my praise for the Mauser M03 trigger. It is every bit as good as described by John Miall, the Australian importer for Mauser and Blaser, in our first conversation about German rifles a few years ago. In this earlier post I listed the Mauser M03's trigger as the first of a number of factors that led me to select this system from amongst the range of European rifles I studied.

I disassembled my Mauser M03 Deluxe a couple of days ago and took some photos with my iPhone along the way. They weren't very good so I did it again yesterday, with a proper camera on a tripod and with bounced flash. I was impressed with what I found inside my Mauser. The pictures help demonstrate how the quality feel and operation of the M03's trigger, and its inherent safety, is the result of good design.

First I had to find the two small cuts in the rubber butt plate, which would allow a No 2 Phillips head screwdriver to loosen the upper and lower screws. I lubricated the screwdriver tip with a tiny amount of petroleum jelly, to help it slip within the rubber. The screwdriver was new, with nice sharp teeth, which helped me avoid damaging the screw-heads. I worked each screw a few turns at a time, moving the butt plate away from the stock progressively. This kept the screw-heads retained within the rubber. The heads of the screws are nicely rounded so an alternative approach is to work on one at a time, backing the first one out through the slit in the rubber butt stock, then holding the butt stock in place while working the second one out. The rubber didn't tear when I tried it this way; the lubricant probably helped.


A No 2 Phillips screwdriver will loosen the two butt plate screws


Once the butt plate was removed I progressively loosened off the screw at the front of the receiver, with a Torx 25 screwdriver, and the Allen head cap-screw holding the rear of the receiver, with a 6mm hex driver. I needed quite a long extension to reach the head of the cap-screw through the hole in the butt. From the T-handle to the tip of the hex driver measures 250mm, which was just long enough.

A Torx 25 driver is needed for the Mauser M03's front receiver screw.

250mm of reach is needed, with a 6mm hex driver, to loosen the M03's rear receiver screw.

A Mauser M03's Allen head cap screw, which secures the rear of the receiver to the stock.


I lifted the receiver assembly out of the stock without much difficulty, but felt some resistance when the magazine catch pressed against the wood and the rubber strips on the sides of the stock's receiver recess. I was careful to avoid bumping and damaging the sharp, top edges of the Deluxe's beautiful walnut with the magazine catch, which protrudes slightly from the left side of the receiver. There was no need to press in the magazine release button; doing so didn't improve clearance. I found I needed to raise the front end of the receiver slightly to ease the trigger lever out from the trigger guard.

With the receiver out in the open I was able to admire its excellent engineering. I should add that it wasn't mere curiosity that caused me to pull my most beautiful Mauser to bits. I had a good reason actually. When I purchased my two 140th anniversary edition M03s from Mialls, with 270 Win and 30-06 barrels, I selected them from stock and arranged for their gunsmith to adjust the triggers to suit my preference before delivery. I asked for 950 grams for the normal trigger and 250 grams for the set trigger. At the same time I ordered a Mauser M03 Deluxe with 6.5x55 and 243 Win barrels, both without iron sights. These needed to be made for me by Mauser in Germany. They duly arrived about five months later, whereupon a muck-up at my end with the Permit to Purchase paperwork meant that there wasn't time for Miall's gunsmith to adjust the Deluxe's trigger before quickly shipping to me, to beat the permit's expiry. Net result - my M03 Deluxe had a noticeably heavier normal trigger than my other M03s. It was around 3 & 1/2 lbs, or 1600gm. Fortunately, all three had the same set trigger weight - 250gm. This was handy, because I pretty well always used the Deluxe, with only the 6.5x55 or 243 Win barrels, over sandbags and with the big, heavy Kahles K624i scope, for sniping at small and distant targets. Nevertheless, I wanted the normal trigger weight of the Deluxe to be the same as the other two M03s. This would avoid the kind of problem I had the one time I went to use the Deluxe's normal weight trigger. I had the 243 barrel installed while I was spotlighting and found a fox, snuffling around a fallen tree trunk. It was only 100m away, thereabouts. I wanted to get the shot off quickly, but accurately. When I put weight on the normal trigger with my calibrated finger, nothing happened. I thought, 'Oh, I haven't cocked it.' But I had. I tried again, pressing a little harder. Still no shot. Then I remembered, 'Ah, this is the one that hasn't been adjusted'. I must have said that out aloud because the fox looked straight at me. I took a moment to push the trigger forward, to set it. My sooky-la-la finger worked well with the set trigger and yes, the fox fell over.

When I looked closely at the trigger mechanism I noticed that the trigger pressure spring was riding over a pin (the trigger spring pin), which had a head at one end and stepped down at the other end, to fit through a hole in the trigger catch. There was also a small bushing fitted on the pin, sandwiched between the head of the pin and the end of the pressure spring. This bushing is not seen in the first picture below, but it's there in the second picture, though not mounted on the pin. There were no screws for making adjustments to the trigger setup.

I compared what I was seeing in the Deluxe receiver with one of my other M03s (which is why a fella should always have at least two). I used a mirror and a torch to look at just the right angle down through the receiver and into the trigger mechanism. I could see the part of the trigger pressure spring that meets the head of its supporting pin, but no bushing. I also looked at the only useful photo of the underside of an M03 receiver that I'd found online, as well as at a parts diagram. In both of these, the length of the head of the pin appeared to be longer than that of the pin in my Deluxe. The head of those pins looked to be about the same as the combined length of the head of my Deluxe's pin and the bushing. Readers have probably figured out what I concluded, i.e. inclusion or removal of the bushing would place more or less tension on the trigger pressure spring and thereby create a heavier or lighter weight for the normal trigger.

Mauser M03 - the trigger pressure spring rides over the trigger spring pin.

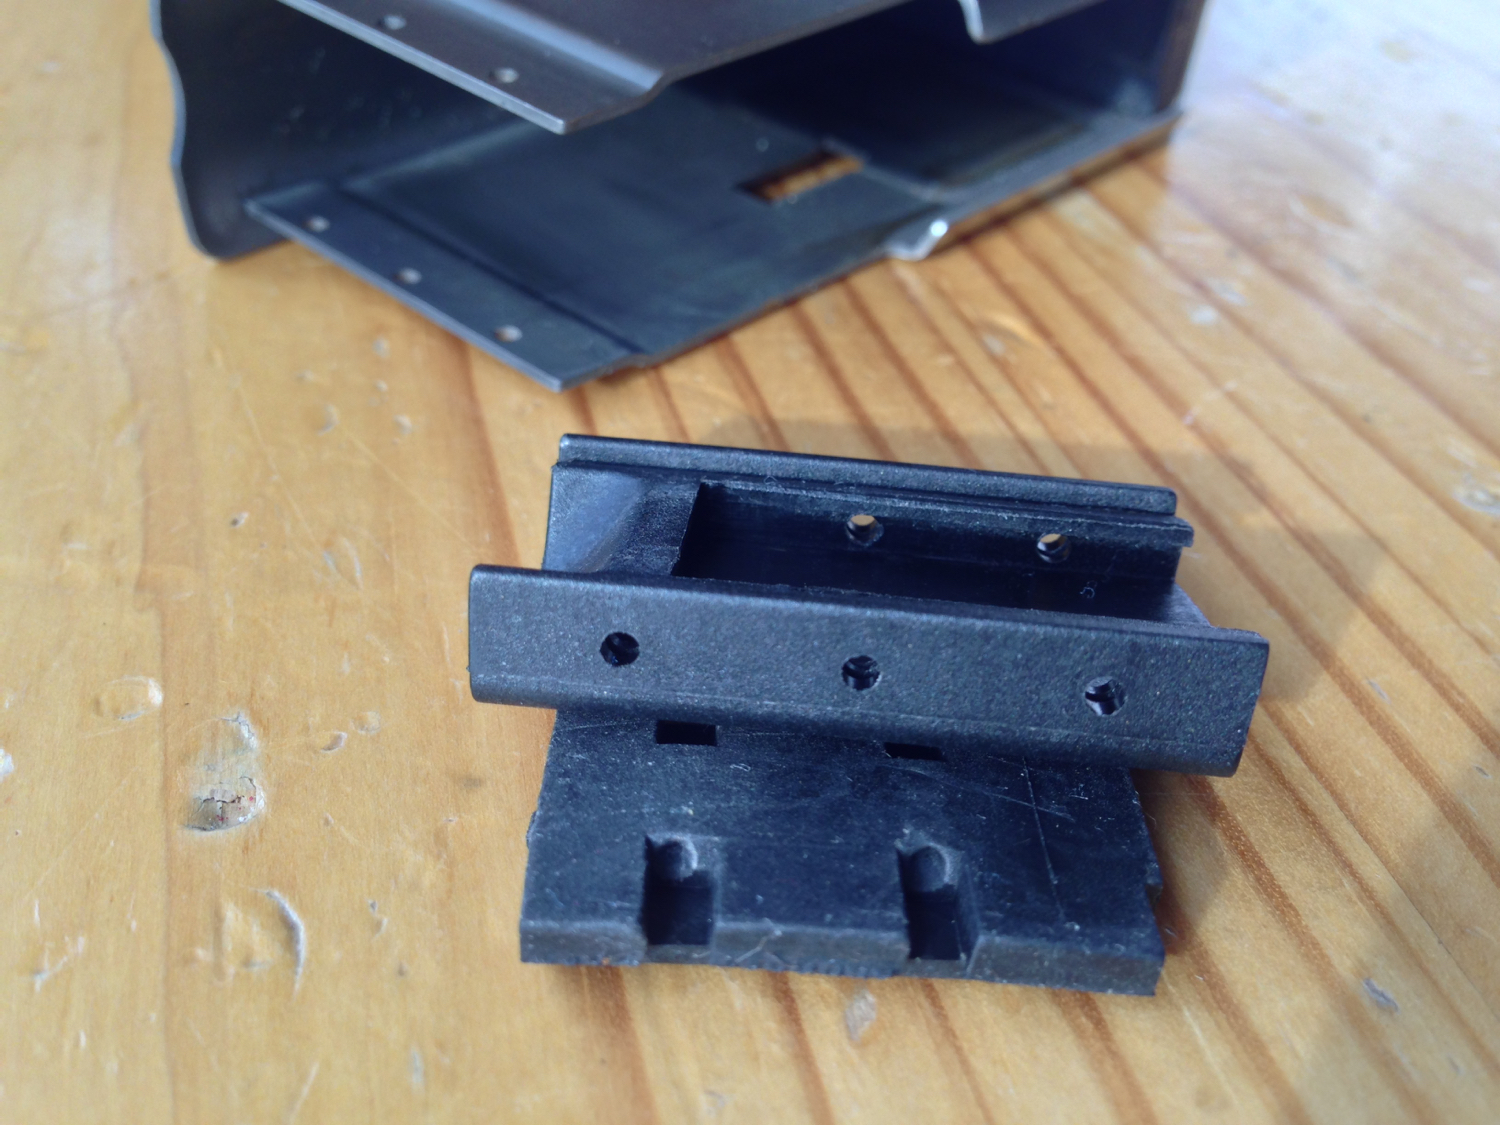
Mauser M03 - fitting this bushing onto the trigger spring pin will increase the weight of the trigger.


Mauser M03 receiver, bolt, barrel and butt plate.

Mauser M03 - the trigger spring pin with longer head for the US market is visible.


Mauser M03 - cropped to show the longer head of the trigger spring pin

But what about the picture found online, showing the longer head of the trigger spring pin? It's the one that's two pics above (click on it to see the full size version, or see the cropped version below it). Well, I happen to know who took that photo. He lives in the United States. It seems to me that M03s made for export to the US are fitted with non-adjustable triggers, of the heavier kind. The optional Combi Trigger is not available either, so, no Euro set-trigger delicacy for my American friends. You're all ex Marines or Navy Seals as I understand it; your fingers are too damn strong!

My Mauser M03 Deluxe now has a normal trigger weight that is the same as the other two, and that's a good thing.

The overriding point here is that the Mauser M03 trigger design is simply excellent. For some countries the weight of the normal trigger is adjustable between either crisp and firm, or crisp and a little less firm. It appears that for the US market, it's just crisp and firm. The normal trigger mechanism has no adjustment screws that can work loose. All M03 triggers, whether adjustable or not, will provide crisp, predictable and reliable performance every time. By design.

The Combi Trigger's set trigger mechanism is easy to use, easy to adjust externally (I haven't bothered - 250gm is light enough) and easy to unset, however great care needs to be taken when using it.

It would be very interesting to get input from M03 users in various countries on their trigger weights, via comments here or a post to the Mauser M03 Blog Discussion Forum (see link at top). If a trigger scale isn't handy, balance the rifle on its butt on a kitchen scale. The increase in weight from your finger to release the trigger is the trigger weight. :-) Please check that the rifle is unloaded! Any holes made in your ceiling are your fault.

Notes on Reassembly

I was careful when lowering the receiver into the stock to avoid damaging the sharp edges of the walnut or the rubber strips inside the stock's receiver recess.

I fitted both the Allan cap screw to hold the rear of the receiver and the front screw with its clamping piece loosely before progressively tightening them. Comfortably hand tight on the cap screw using the T-piece and hex driver was 5 to 6 Nm when I checked with my small torque wrench. I did the front screw up with a Torx screwdriver until it was snugly tight and wouldn't come undone, but no more. I'll report back if this reassembled receiver doesn't produce good groups with its 6.5x55 and 243 Win barrels.

Update: having now fired this rifle again, with the 243 Win barrel installed, the reassembly settings described above worked well from the first shot. Link to video of the confirmation shot.

**********

This post is about the design of the M03's trigger, but I have to mention the cocking/safety mechanism while I'm writing. The key point of difference between a Mauser M03 with its cocking lever and most other rifles with a 'traditional' safety is this:

  • a traditional rifle's safety operates by blocking the unintended release of the firing pin in some way, where the firing pin spring has already been placed under tension, as a result of closing the action. That is, the rifle is ready to fire, and will, if the trigger is bumped and the safety has not been put on, or has inadvertently been bumped off, or can't hold back the strong firing pin spring due to some kind of failure. Many rifles of this kind have a safety lever that moves a short distance along the longitudinal axis of the rifle, i.e. in the direction rifles tend to jostle up and down as we walk while hunting. Contact with clothing, a belt, a backpack or the branch of a bush could flick the safety up, from Safe to Fire.
  • with the Mauser M03, when its cocking lever is sitting at the 'S' for safe position, the trigger sear is not engaged with the trigger catch and the firing spring inside the striking piece is not tensioned for firing. The firing mechanism is relaxed; the rifle is not cocked. The safety mechanism is not being asked to sit there, ready to hold back the strong force of the firing pin spring (e.g. Win Model 70), or actually holding it back until that force is handed over to the trigger sear to hold back (e.g. Rem 700). With the M03, the safety (i.e. the cocking lever) can't be flicked or bumped to the fire position inadvertently. It can only be swung from the safe position to the fire position by a deliberate act of pushing the strongly sprung lever through an arc of 90 degrees, transverse to the long axis of the rifle. I can't see how the cocking lever could be moved from Safe to Fire accidentally. With the Mauser M03, instead of pushing a safety up and over a hill to block the rifle from firing, the cocking lever has to be pushed up and over a hill to enable it to fire. It is a very safe design.

Subscribe